Danish sourdough rye bread
This recipe, from a Copenhagen cellist friend produces delicious pumpernickel-style rye bread: wonderful for lunch with Danish pickled herring or a dry cheese such as Emmenthal or Gruyere - and only four ingredients: rye, water, salt and sourdough.
You can make your own sourdough starter (plenty of advice on the web) but it is subject to the vagaries of whatever wild yeast happens to strike lucky in your dough. I have had excellent results with the "Russia culture" available by mail order from the Wild Yeast Bakery in Cardiff. (If you can't be bothered with proper sourdough then quit this recipe and try using a lactic acid-added get-rich-quick sourdough rye flour mix from Wessex Mill.)
Rye flour is easy to obtain: I use Dove Farm Rye flour which you can buy in enlightened supermarkets. The recipe also calls for "cut rye grains" which also goes by the name of "kibbled rye". I buy it from Wessex Mill (who also sell excellent multi-grain bread flour). If you can't find it you could substitute rye flakes. Whole rye grains you can buy from health food shops such as Infinity Foods.
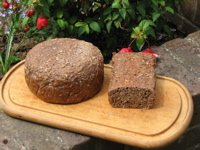
The quantities here make enough for a single 8" (20 cm) square cake tin or two smaller loaves as in the picture. The 200g of sourdough starter would still work for double the quantities. I now use a special rye-bread tin which is a straight-sided shoe-box shape: Eva Professionel rugbrødsform !
In a large bowl mix together:
Leave covered (if possible at 20 -25°) for at least 12 hours. The mixture should then be about 50% larger, spongy and have a delicious sour smell. Take out c. 200 g of the mixture to use as starter for the next batch. Keep in a loose-fitting (CO2 produced!) container in the fridge till the next baking session (within 10 days).
Add:
Alternative dough: if you are not baking for someone with wheat allergy, then you can make the rye bread less likely to be crumbly by substituting 100 or 200g say of strong white flour for some of the rye.
Stir well. The dough should be about the stiffness of freshly mixed concrete. It should not be easy to stir. Adjust with water or rye meal.
Line your baking tin(s) with baking parchment. Press the dough down into the tin (otherwise there may be holes in the bread). Fill no higher than 3 cm from the top. Use a fork to prick the dough.
Original baking method: I usually spray the surface of the dough with water to stop it drying out. Let the dough rise (c.4-5 hours) until the dough has risen about 2 cm. If it rises much more it will collapse during baking. Rising time varies, sometimes 2 hours sometimes 6-8. Cover the tins loosely with aluminium foil and bake for 20 min in a 250° oven at then turn the temperature down to 180° and bake for further 1.5 hours.
Take the bread out and remove from the forms, place on a rack. Remove the baking paper cautiously. The bread easily gets damaged when still hot. When the bread is still slightly warm, wrap it in a dish-towel/kitchen cloth and put it in a plastic bag. Keeping in some moisture helps to soften the crust which otherwise can be hard to carve.
Wait till the next day before cutting the bread.
Alternative baking method: I now do the second rising in a turned-off oven, with a kettle of boiling water in a pan in the bottom. This provides an ideal rising environment - warm and moist with no problems of the top drying out. The dough only takes an hour to rise, and then I just switch the oven on to 160°C and bake it for 3 hours. You can leave the bread to cool in the switched off oven. It is hard to overcook it! So you can do the whole process from starting the second rising in absentia using the oven timer. This method produces a darker more caramellised loaf. I expect you could cook it even longer (perhaps at a an even lower temperature) for an even darker loaf.